
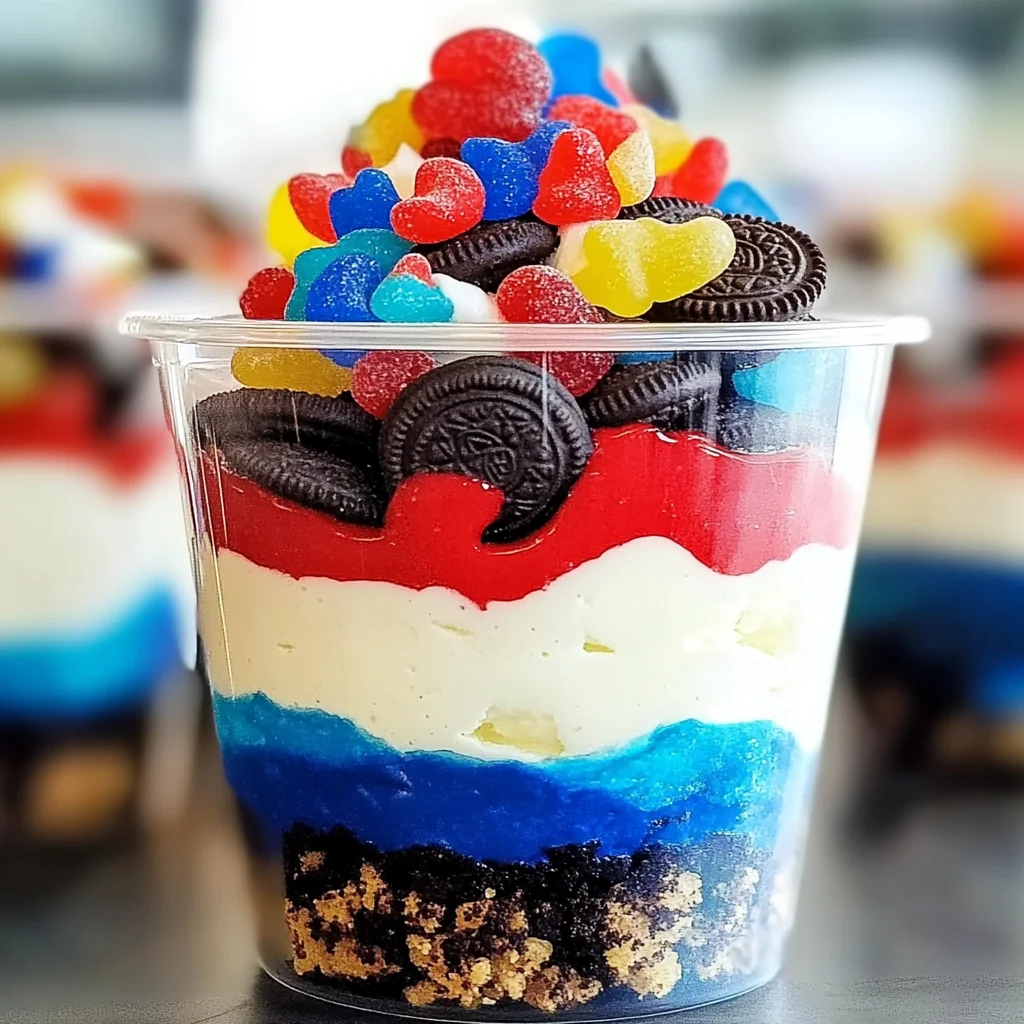
Red, White and Blue Dirt Cups are a fun and festive dessert that everyone will love. This no-bake treat is perfect for summer celebrations, such as the 4th of July. With vibrant layers of creamy cheesecake pudding and crunchy Oreo cookies, these cups are as delightful to eat as they are to look at. They require minimal effort and can be assembled quickly, making them an ideal choice for any gathering. Plus, kids will enjoy helping out in the kitchen, making this dessert a wonderful family activity.
Why You’ll Love This Recipe
- Easy to Prepare: With just a few simple steps, you can create a stunning dessert without any baking required.
- Kid-Friendly: Kids will love getting involved in layering the ingredients and decorating their own cups.
- Customizable: Feel free to switch up the colors or toppings to suit any occasion—birthdays, holidays, or just a sunny day!
- Festive Presentation: The colorful layers not only taste great but also look fantastic, making them perfect for summer gatherings.
- Deliciously Creamy: The combination of creamy cheesecake pudding and crunchy Oreos creates a delightful texture that everyone will enjoy.
Tools and Preparation
Before you start making your Red, White and Blue Dirt Cups, gather your tools. Having everything ready ensures a smooth preparation process.
Essential Tools and Equipment
- Mixing bowl
- Whisk
- Clear plastic cups (9oz)
- Measuring cups
- Spoon
Importance of Each Tool
- Mixing bowl: A large mixing bowl allows you to blend all ingredients thoroughly without spills.
- Whisk: A whisk is essential for achieving a smooth and creamy pudding texture.
- Clear plastic cups: These provide an attractive way to showcase the colorful layers of your dessert.
Ingredients
For the Pudding
- Cheesecake pudding mix
- Milk
For the Layers
- Crushed Oreo cookies
- Red gel food coloring
- Blue gel food coloring
For Decoration
- Red gummy worms
- Blue gummy worms
- Clear plastic cups (9oz)
How to Make Red, White and Blue Dirt Cups
Step 1: Prepare the Pudding
- In a large mixing bowl, whisk together the cheesecake pudding mix and cold milk. Continue whisking until the mixture thickens.
Step 2: Color Your Pudding
- Divide the thickened pudding into two bowls.
- Add blue gel food coloring to one bowl until you reach your desired shade. Leave the other bowl white.
Step 3: Layer Your Cups
- Start by adding 1 tablespoon of crushed Oreos at the bottom of each clear cup.
- Spoon in 2 tablespoons of blue pudding over the Oreos.
- Add another tablespoon of crushed Oreos on top of the blue layer.
- Follow with 3 tablespoons of white pudding.
- Add 1½ tablespoons more of white pudding on top.
- Finish with 4 tablespoons of red pudding.
Step 4: Decorate Your Cups
- Top each cup with more crushed Oreos.
- Add two gummy worms per cup for decoration.
- Optionally, place a flag topper in each cup for extra festivity.
Now your Red, White and Blue Dirt Cups are ready! Chill them for at least 30 minutes before serving to enhance their flavor and presentation. Enjoy this delicious treat at your next summer gathering!
How to Serve Red, White and Blue Dirt Cups
Red, White and Blue Dirt Cups are not only tasty but also visually appealing, making them ideal for celebration tables. Here are some fun serving suggestions to make your dessert stand out.
Individual Treats
- Serve each cup in a clear plastic cup to showcase the layers.
- Use colorful straws for a festive touch.
Party Platter
- Arrange multiple cups on a large tray for easy serving.
- Garnish the tray with fresh berries or themed decorations.
Kid-Friendly Options
- Let kids decorate their own cups with extra candies.
- Provide toppings like whipped cream or sprinkles for personalization.
Themed Decorations
- Add mini flags on top of each cup to enhance the patriotic theme.
- Use red, white, and blue napkins and plates to complement the dessert’s colors.
How to Perfect Red, White and Blue Dirt Cups
To ensure your Red, White and Blue Dirt Cups turn out perfectly every time, consider these helpful tips.
- Use cold milk: Cold milk helps achieve thicker pudding consistency.
- Chill before serving: Refrigerate the cups for at least 30 minutes to enhance flavor.
- Layer carefully: Take your time when layering to create distinct color sections.
- Customize toppings: Feel free to add different candies or fruits based on your preference.
- Use fresh ingredients: Fresh gummy worms and quality Oreos will elevate the taste.
- Experiment with flavors: Try using flavored pudding mixes for a unique twist.
Best Side Dishes for Red, White and Blue Dirt Cups
Pairing side dishes with your Red, White and Blue Dirt Cups can enhance your summer gatherings. Here are some delicious options to consider.
- Grilled Corn on the Cob: Sweet corn brushed with butter makes a perfect summer side.
- Potato Salad: A classic dish that complements any barbecue spread well.
- Watermelon Slices: Refreshing fruit that adds a burst of color and sweetness.
- Coleslaw: Crunchy slaw brings balance with its tangy flavor and creamy texture.
- BBQ Chicken Skewers: Easy-to-eat skewers that bring savory goodness to your table.
- Caprese Salad: Fresh tomatoes, mozzarella, and basil offer a light and zesty option.
- Pasta Salad: A chilled pasta salad with veggies is both filling and colorful.
- Fruit Kabobs: Colorful fruit skewers provide a healthy option that’s fun to eat.
Common Mistakes to Avoid
Making Red, White and Blue Dirt Cups can be a fun experience, but there are common mistakes to keep in mind.
- Skipping the chilling time: Not chilling the cups for at least 30 minutes can lead to a less flavorful dessert. Make sure to let them sit in the fridge to enhance the taste.
- Incorrect pudding consistency: Using lukewarm milk results in runny pudding. Always use cold milk for thicker pudding.
- Uneven layering: Poor layering can ruin the visual appeal. Take your time to layer ingredients evenly for a beautiful presentation.
- Ignoring ingredient temperatures: Using ingredients at room temperature can affect texture. Ensure all components are properly chilled before assembly.
- Overloading on toppings: Adding too many candies or toppings can make the cups messy. Keep it simple to maintain balance and aesthetics.
Storage & Reheating Instructions
Refrigerator Storage
- Store leftover Red, White and Blue Dirt Cups in airtight containers.
- They will last up to 3 days in the refrigerator.
Freezing Red, White and Blue Dirt Cups
- These cups can be frozen for up to 1 month.
- Use freezer-safe containers or wrap well with plastic wrap.
Reheating Red, White and Blue Dirt Cups
- Oven: Not recommended as this dessert is best served cold.
- Microwave: Avoid reheating; serve chilled for optimal taste.
- Stovetop: Not applicable; enjoy directly from the fridge.
Frequently Asked Questions
Here are some common questions about making Red, White and Blue Dirt Cups.
How long do Red, White and Blue Dirt Cups last?
These dessert cups can last up to 3 days in the refrigerator when stored properly in airtight containers.
Can I customize my Red, White and Blue Dirt Cups?
Absolutely! You can customize layers with your choice of fruits or different candies. Get creative with your toppings!
What should I serve with Red, White and Blue Dirt Cups?
These cups pair perfectly with summer beverages like lemonade or iced tea at any gathering.
Are Red, White and Blue Dirt Cups suitable for kids?
Yes! This recipe is kid-friendly, making it a great option for family gatherings or parties. Kids will love helping with layering!
Final Thoughts
Red, White, and Blue Dirt Cups are not only visually stunning but also deliciously satisfying. Their easy preparation makes them perfect for summer celebrations or any festive occasion. Feel free to customize these treats with your favorite toppings, ensuring that everyone can enjoy their own unique version. Try them out at your next gathering!
Red, White and Blue Dirt Cups
- Total Time: 0 hours
- Yield: Serves 6
Description
Red, White, and Blue Dirt Cups are the ultimate no-bake dessert for your summer celebrations, especially the 4th of July. These vibrant cups combine layers of creamy cheesecake pudding with crunchy Oreo cookies, creating a treat that’s as delightful to eat as it is to look at. Perfect for family gatherings, this fun recipe invites kids to join in on the layering fun, making it a memorable kitchen activity. Quick to prepare and customizable for any occasion, these dirt cups are sure to impress your guests while adding a festive flair to your dessert table.
Ingredients
- Cheesecake pudding mix
- Milk
- Crushed Oreo cookies
- Red gel food coloring
- Blue gel food coloring
- Red gummy worms
- Blue gummy worms
Instructions
- In a mixing bowl, whisk together the cheesecake pudding mix and cold milk until thickened.
- Divide the pudding into two bowls; tint one with blue gel food coloring while leaving the other white.
- Layer each clear cup starting with crushed Oreos at the bottom, followed by blue pudding, more Oreos, white pudding layers, and finish with red pudding.
- Top each cup with crushed Oreos and gummy worms for decoration. Chill for 30 minutes before serving.
- Prep Time: 15 minutes
- Cook Time: None
- Category: Dessert
- Method: No-bake
- Cuisine: American
Nutrition
- Serving Size: 1 serving
- Calories: 300
- Sugar: 22g
- Sodium: 150mg
- Fat: 15g
- Saturated Fat: 5g
- Unsaturated Fat: 10g
- Trans Fat: 0g
- Carbohydrates: 42g
- Fiber: 2g
- Protein: 4g
- Cholesterol: 15mg